The Alive Survey Definition Form is used to design and export individual, customized surveys for data collection. It allows the user to define custom parameters for recording data relative to each survey (e.g., date and location information), as well as for each observation made during surveys (e.g., number of observed species, weather conditions, canopy height, life stage, etc.). The user also has the ability to customize a list of species from the RT_TAXONOMY table to be used in the survey.
Watch the Office Hour recordings on Building Alive Surveys (Part 1) and (Part 2) to learn more and see a demonstration.
Access the Alive Survey Definition Form
To open the Alive Survey Definition Form:
1.Open EQuIS Professional and connect to the desired EQuIS Database (one that has the Alive Schema applied to it).
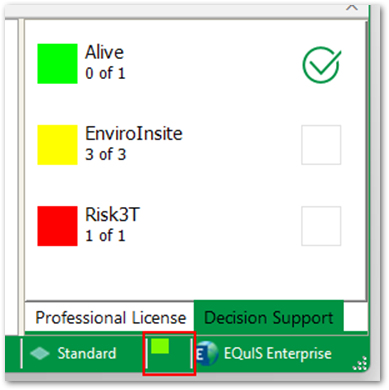
2.Activate an Alive license by clicking the empty area next to the license description in the bottom right-hand corner of EQuIS Professional and checking the box for Alive in the resulting window.
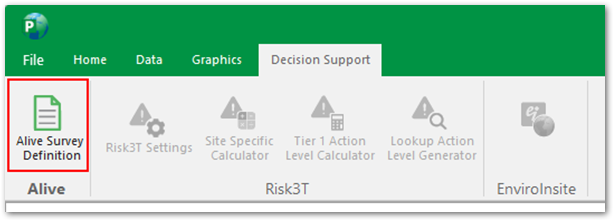
3.Navigate to the Decision Support ribbon and select the Alive Survey Definition Form icon.
Note: If the Alive Survey Definition is still greyed-out after activating the license, it may be that the Alive Module was not included during the installation of Professional. Installations can be retroactively repaired or changed to include any missing modules. |
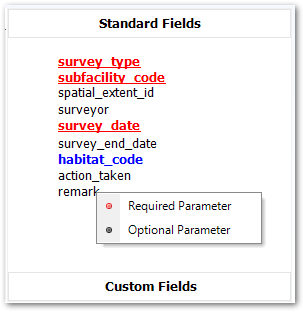
The Alive Survey Definition Form will look like the image below the first time it is opened without any information or parameters loaded.
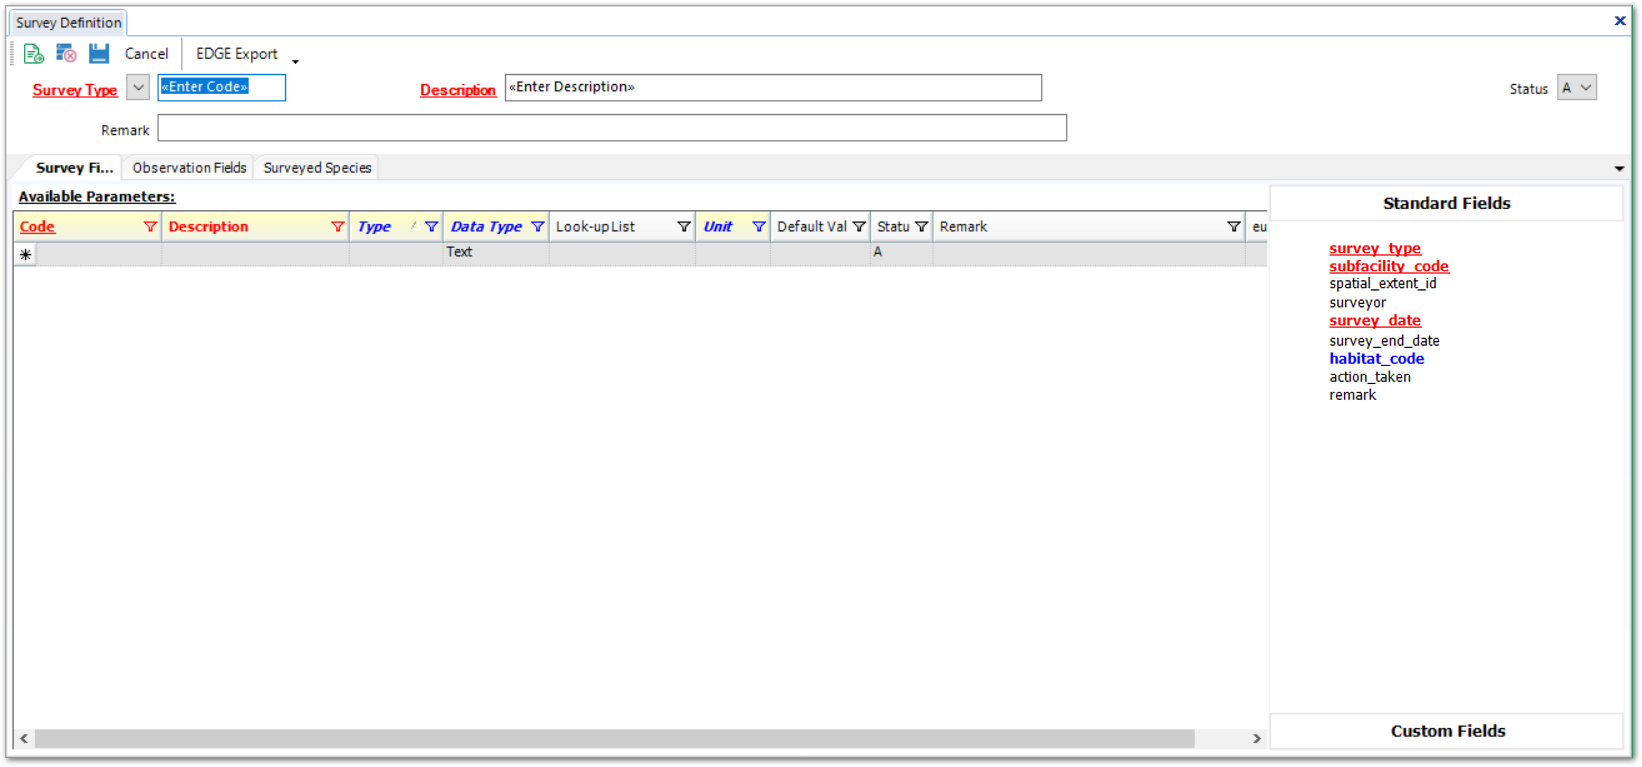
Header and Toolbar Section
•New Survey Type – Define a new survey.
•Delete Survey Type – Delete the currently selected survey.
•Save Survey Type – Save all changes made to the database, both for the survey definition and any shared lists/parameters.
•Cancel – Cancel any changes made to the survey or any shared lists/parameters.
•EDGE Export – Used to generate custom Alive format for selected Survey Type. See the EDGE Export article for more detail.
Right Panel
In the right panel, either the list of Standard Fields or the list of Custom Fields can be expanded. Parameters can be added from the Available Parameters section to the Custom Fields list.
Standard Fields – The Standard Fields section contains a list of pre-populated parameters included in the survey definition. These Standard Fields will be found in every Survey Type and will be included as fields in the DT_SUBFACILITY, DT_SURVEY, and DT_SURVEY_OBSERV sections in the Alive format.
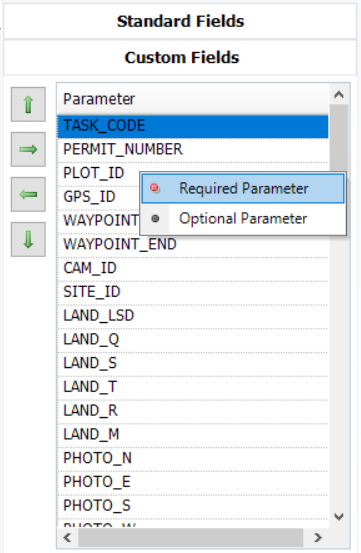
Custom Fields – The Custom Fields section tailors a survey definition to the target species or use case that the definition describes. Custom fields are chosen from the Available Parameters pane. The custom fields will be displayed in the order they appear on the list when the survey format is opened in EDP or EDGE. The Custom Fields are linked to two tables:
•RT_GROUP
•RT_GROUP_MEMBER
More information on these relationships can be found below in Survey Defintion Setup Step 3: Define Survey and Observation Fields.
Tabs
Three tabs are available on the Alive Survey Definition form.
Survey Fields – The Survey Fields tab displays information about the survey section of the survey or parameters/values that are to be recorded only once per survey. Use this tab to define which parameters should be recorded for the survey. When running a report, the parameters that have been defined in the Survey Fields tab will populate from the DT_SURVEY table.
Observation Fields – The Observation Fields tab displays information about the observation section of the survey or parameter/values that are to be recorded with multiple observations per survey. Use this tab to define which parameters should be recorded for each observation made while performing the survey. When running a report, the parameters that have been defined in Observation Fields tab will populate from the DT_SURVEY_OBSERV table.
Surveyed Species – Observations made during a survey typically revolve around some species of flora or fauna. This list of species is contained in a hierarchical table, RT_TAXONOMY. The RT_TAXONOMY table is setup so that the species can be grouped together in a logical fashion. For a guide on setting up the RT_TAXONOMY table, please read the Taxonomy section of the Alive Introduction article. Any level of the taxonomy structure can be associated with a particular survey using the Surveyed Species tab.
Available Parameters
Under the Survey Fields tab and the Observation Fields tab, the Available Parameters pane is displayed in most of the form and will contain every parameter added to the RT_PARAMETER table.
The following explains each column in the Available Parameters list. Note that red column names indicate that the fields are required.
•Code – The parameter code is a shortened or abbreviated representation of the parameter. Entries for this field are stored in RT_PARAMETER.PARAMETER_CODE. This is a required field.
Note: If the following characters are used in the Code column, they will be converted to Unicode when added to the ST_REPORT_PARAMETER table, which could cause the PARAM_NAME to exceed the 30-character limit. •Parentheses ( ) •Pound sign # •Comma , •Hyphen - |
•Description – Allows for more in-depth explanation of the parameter, its purposes, and uses. Entries for this field are stored in RT_PARAMETER.PARAM_DESC. This is a required field.
•Type – Optional field intended to be filtered to make finding specific parameters easier. This field is a lookup to RT_PARAM_TYPE.PARAM_TYPE; any new PARAM_TYPE values must be entered in this reference table.
•Data Type – Defines what type of data should be entered into this parameter. The values will be restricted accordingly in EDP, EDGE, and Collect.
•Text – Used for any textual value that includes letters and numbers.
•Integer – Whole numbers, both positive and negative.
•Decimal – Any number, with or without a decimal, whether positive or negative.
•Percent – Any number ranging from 0.00 to 100.00, restricted to two (2) decimal places.
•Date/Time – Any date, time, or date and time combination.
•T/F – True or False; recorded as "Y" for yes or "N" for no in the database.
•Lookup-List – When mousing-over the cells, a button will appear in the right side of the cell. Clicking it will open a dialog window where a custom list can be created for the parameter, or a pre-existing list can be selected. Entries for this field are stored in the RT_LOOKUP table.
•Unit – Specifies what unit type values should be recorded. It can be helpful to append the unit to the parameter Code (e.g., WEIGHT_G, with the "G" standing for grams). This field is a lookup to the RT_UNIT table.
•Default Value – Sets the value the parameter should be if no other value is selected.
•Status – Setting the value to anything other than "A" (i.e., Active) will disable the parameter so it no longer shows up in any surveys.
•Remark – Field for additional remarks or comments about the parameter.
Survey Definition Setup Steps
1. Add Survey Type
The Survey Type drop-down arrow lists surveys that are already defined in the database.
Click the New Survey button on the toolbar to define a new survey. Enter a new value in the Survey Type field, and enter the header information, which populates the following fields in the RT_SURVEY_TYPE table:
•SURVEY_TYPE
Notes: •The Survey Type cannot begin with a numeric value. •If the user navigates away from the new survey (selects another survey in the drop-down), the form needs to be reopened to see the new survey again. |
•DESCRIPTION (stored in RT_SURVEY_TYPE.SURVEY_DESC)
•STATUS – Choose setting for RT_SURVEY_TYPE.STATUS_FLAG from the Status drop-down. The default status is "A" for active.
•REMARK
2. Define Available Parameters
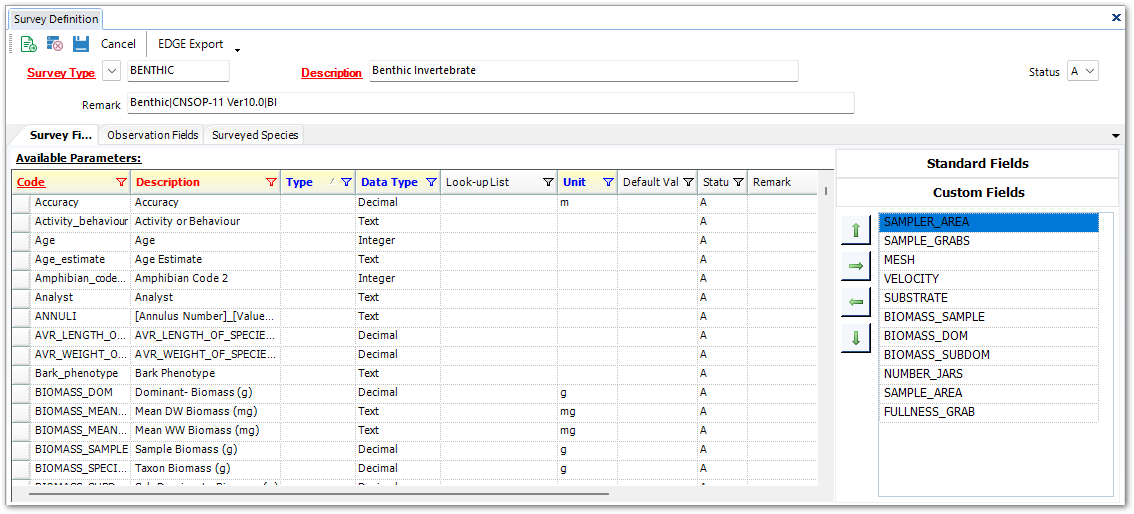
The Available Parameters are parameters that can be used or created when customizing new and existing surveys. A new parameter can be created by simply adding a new row at the bottom of the Available Parameters list. Click on the next new row starting with an asterisk (see example image below) and enter the information for the parameter to be added. Enter the appropriate information into each column (i.e., field).

Tip: When adding new parameters to the available parameters list, try to make them as generic as possible while still making them useful for the selected survey. For example, if creating a Fish Survey that requires the recording of the weight of the fish, use 'WEIGHT' instead of 'FISH_WEIGHT' so that the parameter can be used in other surveys. |
3. Define Survey and Observation Fields
When the Survey Fields tab is active, the parameters in the Custom Fields section define the survey fields for the current survey definition. When the Observation Fields tab is active, the parameters in the Custom Fields section define the observation fields for the current survey definition. Use these tabs to define which parameters should be recorded for the survey.
The arrow buttons can be used to manipulate the list of custom fields:
•Right – Adds the selected rows from the Available Parameters list to the Custom Fields list.
•Left – Removes the selected rows from the Custom Fields list.
•Up – Moves the active row in the Custom Fields list up one place.
•Down – Moves the active row in the Custom Fields list down one place.
When the survey definition is saved, new groups are created in the RT_GROUP table depending on whether survey fields and/or observation fields have been defined. The GROUP_CODE field in RT_GROUP will have a prefix corresponding to each tab. After the prefix, the GROUP_CODE field will additionally have the SURVEY_TYPE of the current survey definition, as defined in the header at the top of the page. The parameters for the definition are stored in the RT_GROUP_MEMBER table with the GROUP_CODE field matching the GROUP_CODE field added to the RT_GROUP table. The GROUP_CODE prefixes are:
•ASPG – Survey Fields
•AOPG – Observation Fields
Optional and lookup Standard Fields can be set as required by right-clicking on the parameter name and selecting Required Parameter. This will make data entry required for that parameter, but only for the selected survey being edited.
When an optional or lookup Standard Field is made required, and the survey is saved, those parameters will populate the REQUIRED_SURVEY_FIELDS and REQUIRED_OBSERV_FIELDS in the RT_SURVEY_TYPE table (see image below). Note that the optional or lookup Standard Fields can also be made required by manually populating these fields in the RT_SURVEY_TYPE table (by replicating what is displayed in the image below), rather than selecting them from the Alive Survey Definition Form user interface.
![]()
Likewise, any of the Custom Fields can be set as required by right-clicking on the parameter name and selecting Required Parameter. This will make data entry required for that parameter, but only for the survey definition currently being edited.
4. Assign Taxonomy Codes
Select the Surveyed Species tab to display the available TAXONOMY_CODEs.
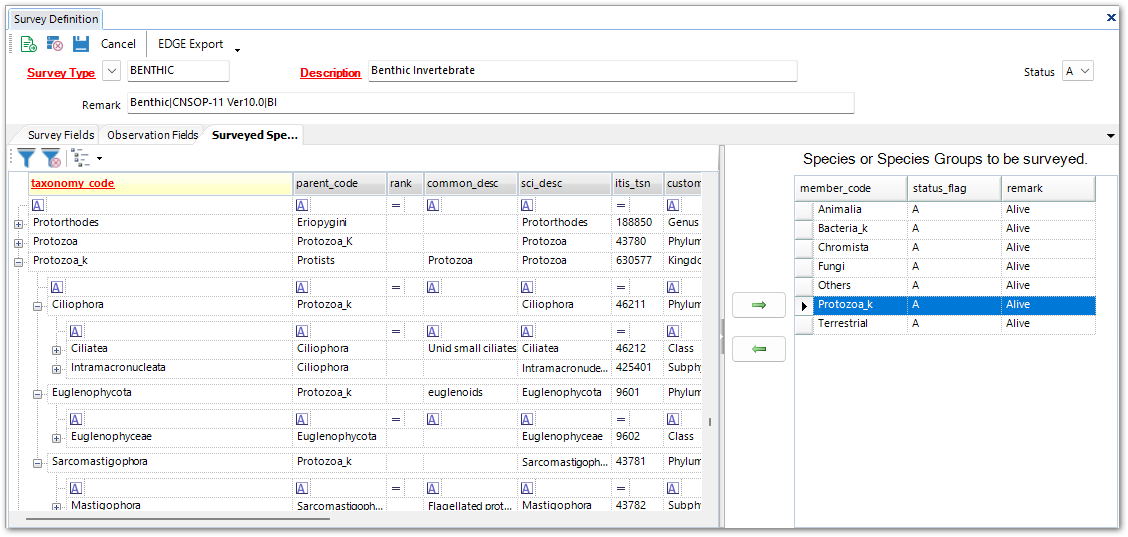
Simply move the TAXONOMY_CODE(s) over to the right column, using the arrows, and the survey will include any child records for that TAXONOMY_CODE. For example, when setting up a benthic survey, simply choose to include "Protozoa_k", and thus, any protozoa listed under "Protozoa_k" would automatically be included for that survey. When the survey is exported as an EDGE Format, only those TAXONOMY_CODE(s) chosen for that survey will be included.
Similar to survey and observation fields, when the survey definition is saved, a new group is created in the RT_GROUP table for any Surveyed Species that have been defined. The GROUP_CODE field in RT_GROUP will also have a prefix corresponding to this tab. After the prefix, the GROUP_CODE field will additionally have the SURVEY_TYPE of the current survey definition, as defined in the header at the top of the page. The member species for the definition are stored in the RT_GROUP_MEMBER table with the GROUP_CODE field matching the GROUP_CODE field added to the RT_GROUP table. The GROUP_CODE prefix is:
•AOTG – Surveyed Species
5. Save
After the survey is setup, click the Save icon (upper-left) to save the survey.
6. EDGE Export
Please see the EDGE Export article for instructions.
Once exported, the format can then be used in EDGE for field data collection. Please refer to links in the Data Collection article for more information.
Survey Definition Edit Steps
When editing a survey definition that has already been created, a parameter that is a member of any group (e.g., in the Custom Fields list of one or more Survey Definitions) must first be removed from each group to which the parameter belongs before it can be edited (including the survey definition that is being edited).
1. Identify each group to which the target parameter belongs
This can be done in one of two ways.
Using RT_GROUP_MEMBER
a)Open the RT_GROUP_MEMBER table.
b)Filter the MEMBER_CODE field by the code of the parameter as defined in the Alive Survey Definition Form. The entries in the GROUP_CODE field of the results are the groups to which this parameter belongs (note the prefix as described in Step 3 of Survey Definition Setup Steps).
c)Perform Step 2 below for each group.
Using only the Alive Survey Definition Form
For each definition in the Survey Type drop-down menu:
a)Click the Survey Fields tab.
b)Scour the Custom Fields list for the target parameter.
c)Perform Step 2 below.
d)Click the Observation Fields tab.
e)Scour the Custom Fields list for the target parameter.
f)Perform Step 2 below.
2. Remove the parameter from each of these groups
Select the target parameter in the Custom Fields list so that it is highlighted and click the left arrow to remove it.
3. Edit the parameter
Once the target parameter has been removed from every group to which it belonged, any desired edits can be made to the parameter’s fields (Code, Description, Type, etc).
4. Re-add the parameter to the groups
Using the right arrow, re-add the target parameter to the groups identified in Step 1.